The idea started simple, I wanted to know if anyone was cloning our website or critical parts of it. As a security-conscious person, I wanted to know when attackers tried to impersonate our brand online.
Imagine this scenario: You wake up one morning to discover that someone has created a fake version of your login or ecommerce checkout page. They've copied your design, your logo, even your domain name with a slight typo. Your customers are being tricked into entering their credentials or buying something on this malicious site. By the time you find out, it's already too late.
The same campaign targeted several other brands in Germany.
This happened to several companies I know. The real damage is often to your reputation, people might think the brand was involved or responsible, even though the attack came from scam ads or fake profiles on social networks. I wanted to build something that could catch these attacks the moment they happen, not days or weeks later, and definitely not only after the company gets several complaints about purchases on those fake sites.
In this article
The problem with existing solutions
Most phishing detection tools are built for enterprise customers with big budgets. Small and medium businesses often can't afford the sophisticated monitoring systems that large corporations use to protect their digital assets. Yet SMBs face the same threats: brand impersonation, customer data theft, and reputation damage.
The existing solutions I found were either:
- Too expensive: Enterprise-grade tools costing thousands per month
- Too complex: Requiring dedicated or specialized security teams to manage
- Too slow: On the free tier, alerting you after the damage is already done
- Too noisy: Generating false positives that waste time, or too many alerts that are not actionable
I needed something that could detect phishing attempts in real-time, was affordable for smaller businesses, and could be set up in minutes without requiring a security expert.
Combining certificate monitoring with real-time detection
During last year's impersonation attack, I relied heavily on CertStream to monitor newly issued SSL certificates containing our brand in the domain name. It was incredibly useful for catching suspicious domains as soon as they appeared. Unfortunately, CertStream is now defunct, so I needed a replacement. That's why I built CertPatrol, a lightweight terminal tool that monitors Certificate Transparency logs for new certificates that might be used for phishing. You run it with parameters to filter domains, then process the output to generate alerts. While this helps identify potential threats, it's only part of the solution.
Certificate monitoring is great for spotting new domains that look like yours, but it can't tell you if your content is being loaded elsewhere, like on a totally unrelated domain, or even injected into a hacked legitimate website. In these cases, CT log monitoring falls short. What I really needed was a way to know when and where our cloned content is actually being loaded, no matter what domain it's on.
The building process: From idea to implementation
With the problem defined, I started testing different approaches. The challenge: detect content cloning in real-time, without being easily bypassed, and without hurting web performance.
Initial experiments and prototypes
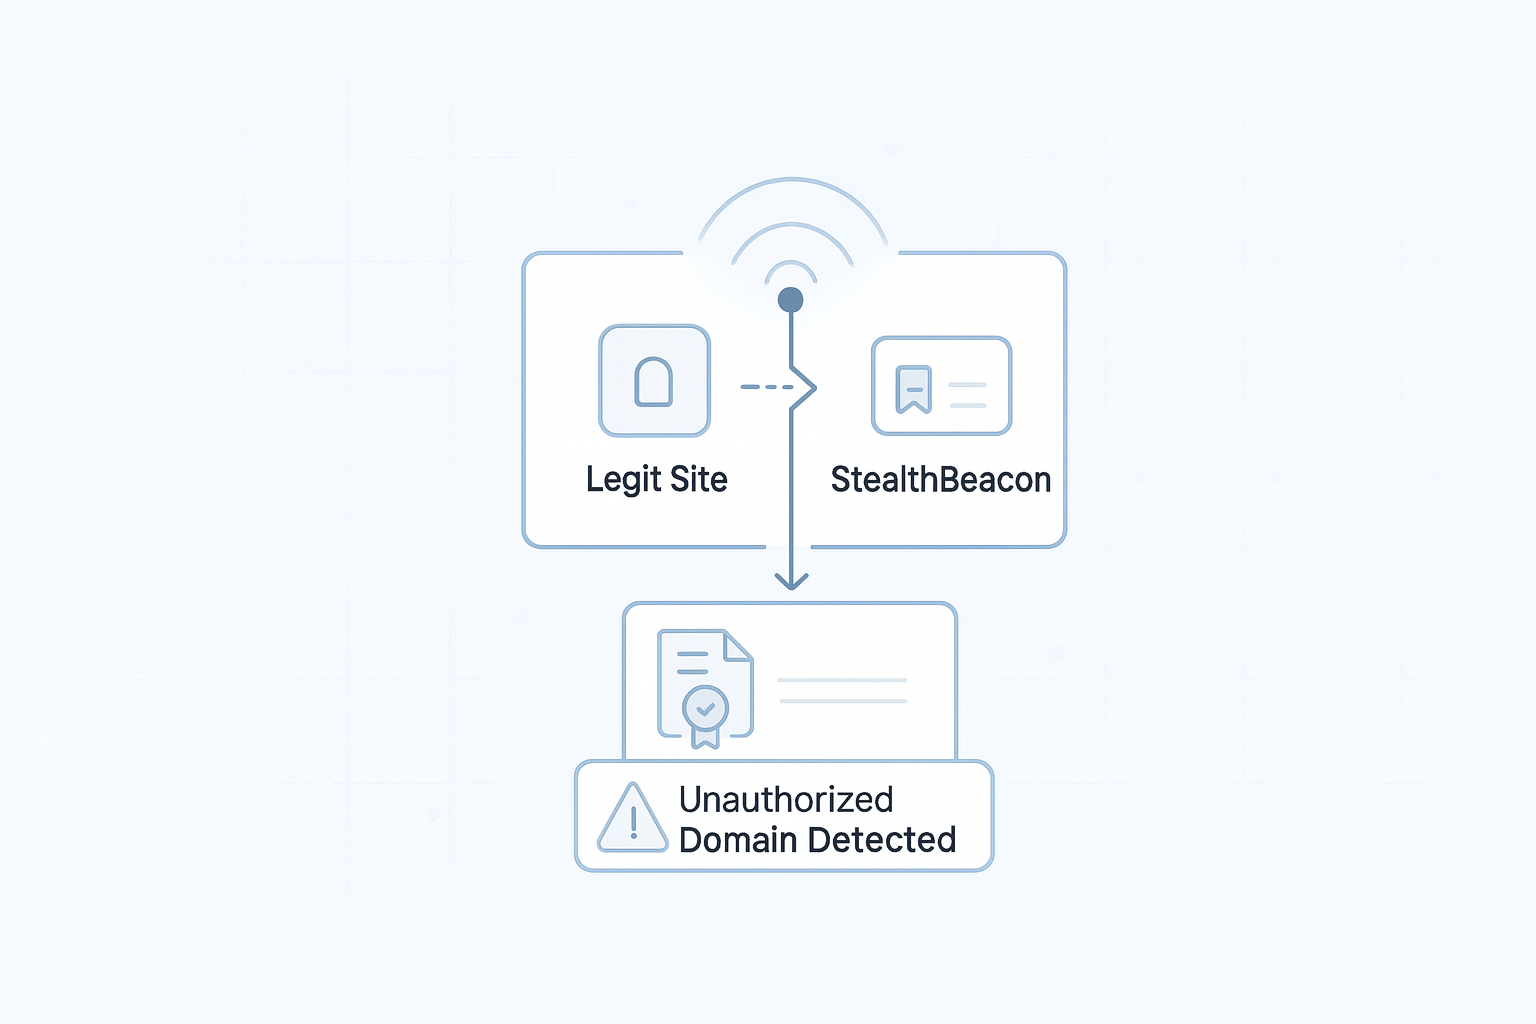
I tried a bunch of "clever" ideas—JS fingerprinting, WebSocket callbacks, browser API hacks. Every time I added complexity, it got more brittle: browser extensions, privacy tools, CSP rules, all broke things. The more advanced, the less reliable. In the end, the old-school web beacon (1x1 transparent GIF) is still the most robust and stealthy option for this.
Invisible tracking pixels are dead simple, and that's the point. They're almost impossible to block without breaking the page, work everywhere, no JS, no dependencies, no browser quirks. They're just part of how the web works, which is why they're so effective here.
Just logging the referrer is table stakes. I wanted more context, so I started pulling in extra request metadata, user agent, IP, headers, etc. But to be clear: a pixel can't directly detect content injection on legit sites. What it can do is show when your pixel is loaded from an unexpected domain or page, which sometimes happens if your content is injected elsewhere. In practice, we only see the data from visitors who load the pixel (usually potential phishing victims), not the attackers or the injection itself. The pixel is just a tripwire for unauthorized use, not a magic bullet for every attack vector.
From prototype to production
I wanted to see if I could build the whole system from scratch, so I went with Cloudflare Workers. Edge compute was perfect: global distribution, low latency, auto-scaling, no infra headaches.
I spent about a week testing architectures, performance, and optimizing detection logic. The key was balancing accuracy (minimizing false positives) and speed (making sure the pixel loads instantly). In the process I learned a lot about how Cloudflare Workers actually function, since I started with only a pretty basic understanding. Getting hands-on forced me to really dig into the details and quirks of the platform. And reach out to some people I know they have been crushing it with Workers for years, like Fermin.
Building the complete system
Once the core detection worked, I realized I needed a full system: user management, company isolation, real-time alerts, analytics, and a dashboard for business users.
Each piece was built iteratively, tested in the real world. Auth went from API keys to full RBAC. The dashboard grew from basic logs to a real threat management interface.
The result: StealthBeacon, a complete system with built-in alerts and everything you need. By using webhooks for the alerts, you can integrate it with your existing tools and workflows such as Slack, Jira, email, N8N workflows, etc. You can still combine it with CertPatrol for broader monitoring.
Here's how CertPatrol and StealthBeacon work together:
CertPatrol Terminal Tool] --> B[Detects new domains
similar to yours] C[Stealth Beacon Detection
Complete System] --> D[Detects when cloned
content is loaded] B --> E[Early Warning System] D --> E E --> F[Immediate Response
Take down requests] E --> G[Customer Protection
Alert your users]
This dual approach gives you early detection: you know about potential threats before they go live, and you get instant alerts when someone actually tries to use them. If the attacker is testing the site before launching, you can take it down before it gets reach.
Building an accessible detection system
The challenge, was to create something powerful enough to detect sophisticated attacks, yet simple enough for SMBs to use and afford. I wanted a system that alerts you immediately when a cloned site loads your content, like an early warning system.
The stealth beacon concept
The core idea is simple, embed invisible tracking pixels in your legit site that only load from authorized domains. If someone clones your site and loads it from an unauthorized domain, the pixel triggers an alert.
The pixel always returns a valid 1x1 GIF, so the cloned site keeps working. The attacker never knows they've been detected.
Making it work for real businesses
The technical implementation needed to solve several real-world problems:
Multi-tenant architecture: Companies with multiple domains and users with different permission levels need to manage them. I built a role-based access control system that lets you invite team members, assign permissions, and manage everything from a simple dashboard.
Quota management: To keep costs predictable, I implemented a quota system with three tiers, Free, Plus, and Enterprise.
Real-time performance: The detection system is built for speed. Internal processing for the critical path logic is always under 10ms, with quota checks adding less than 5ms. Your website performance stays unaffected.
Privacy-first design: All processing happens server-side. No client-side JavaScript, no tracking cookies, and absolutely no data collection for authorized requests. We only log data when an unauthorized (incident) request is detected, never during normal, legitimate use.
The technical stack
As I decided to build it entirely on Cloudflare Workers, starting on a free tier plan but designed to scale when necessary. This approach improved speed and performance significantly while keeping costs minimal.
My system uses invisible tracking pixels that load from your legitimate site but trigger alerts when accessed from unauthorized domains. Cloudflare Workers provide global edge computing with minimal latency, ensuring the detection system responds instantly worldwide. For the database, I used Cloudflare D1, which integrates seamlessly with Workers and provides SQLite-compatible storage with automatic scaling.
Here's the architecture:
This the architecture I believe if capable of delivering enterprise-grade security with SMB-friendly simplicity and pricing.
Technical architecture decisions
Every technical decision was driven by the need to balance performance, cost, and accessibility. The challenge was building something that could handle enterprise-scale threats while remaining accessible to smaller businesses. Here's how I approached each architectural choice.
Why Cloudflare Workers?
The decision to build entirely on Cloudflare Workers wasn't just about cost, it was about performance, global reach, and honestly, a much better developer experience. Traditional server-based solutions would need multiple servers across regions to get the same coverage. With Workers, every request is processed at the edge, closest to the user, and I didn't have to mess with hard config, complex setup, or slow deploys. I don't rule out testing or moving to AWS or Azure in the future, but for me, Cloudflare made it dead simple to launch and iterate fast. For an MVP, it's more than enough.
From a cost perspective, the free tier covers 100,000 requests per day, which is more than enough for testing and small deployments. The pay-per-request model scales naturally with usage, and there are no infrastructure costs to worry about, no servers to provision, maintain, or monitor, etc.
The performance challenge
When you're embedding tracking pixels on customer websites, performance becomes critical. Every millisecond of delay could impact the user experience. Traditional server-based architectures introduce latency through network hops, load balancers, and database connections.
Cloudflare Workers solve this by running code at the edge, a very efficient way to process requests. This eliminates the network latency that would otherwise add 50-200ms to each request. The result is pixel requests that complete in under 10ms, making them virtually invisible to end users.
Database choice: D1 over alternatives
I spent considerable time evaluating database options before settling on D1. The database choice was particularly critical because it needed to handle the edge computing model while maintaining the performance requirements.
Traditional databases like PostgreSQL or MySQL would require separate hosting infrastructure. This meant additional servers to provision, connection management to handle, and complex scaling strategies to implement. Each database connection would add latency to our pixel requests, defeating the purpose of the edge computing approach.
MongoDB felt like overkill for the structured data I was working with. It would have introduced unnecessary complexity without providing significant benefits.
SQLite was appealing for its simplicity and performance, and I have been using it for years in other projects, but it lacked built-in scaling or replication capabilities. In a multi-tenant system handling potentially millions of requests, I needed something that could scale automatically without manual intervention.
D1 solved all these problems elegantly. It offers SQLite compatibility with familiar SQL syntax, so there's no learning curve for me. The automatic scaling eliminates the need for manual sharding or replication. It works out of the box with zero configuration, includes built-in backup for automatic data protection, and integrates seamlessly with the same edge network as Workers.
Cloudflare Smart Placement: a hidden performance win
After deploying the first stable version, I discovered Cloudflare Smart Placement, a feature that automatically runs Workers closer to your backend infrastructure instead of just the end user. This was a massive improvement in response time for anything that needed to talk to the database. Instead of always running at the edge nearest the user, Smart Placement figures out the optimal location to minimize latency, especially for backend-heavy workloads.
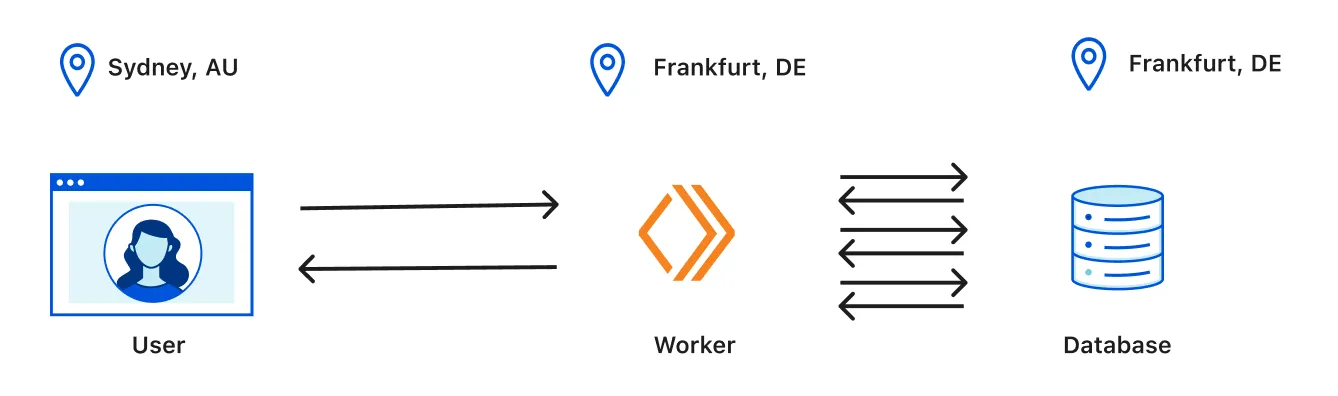
For my use case, this meant pixel requests that needed to hit the database could be processed even faster, without the extra round-trip latency to the database region. It's one of those features you don't realize you need until you see the difference in real-world response times.
The multi-tenant challenge
Building a system that could serve multiple companies simultaneously while keeping their data completely isolated was one of the most complex challenges. Each company needed their own domains, beacons, users, and incident data, all while sharing the same underlying infrastructure.
Multi-tenant architecture design
The system needed to support multiple companies with different user roles and permissions. I designed a clean separation that maintains data isolation while enabling flexible team management.
This design ensures complete company isolation, each company's data is completely separated from others. The flexible user roles (admin, user, viewer) allow companies to control access based on their needs. Team management features let you invite and manage team members easily, and the permission system is designed to scale as companies grow.
The key for me was also separating user identity from company membership. A single user can belong to multiple companies with different roles in each. This allows for scenarios like security consultants who manage multiple client accounts, or employees who work for different organizations. The role-based access control system ensures that users can only access data for companies they belong to, with permissions appropriate to their role.
Performance optimization strategies
Speed was critical, the pixel requests couldn't impact website performance. I implemented several layers of optimization to ensure the system remained invisible to end users.
The caching strategy includes user context caching with a 5-minute TTL for authentication, domain validation caching to avoid repeated database lookups, and sub-millisecond quota checking. Database optimization involved strategic indexing on frequently queried fields, connection pooling to reuse database connections, and query optimization to minimize database round trips.
The edge computing benefits are particularly powerful here. Global distribution means requests are handled closest to the user, eliminating latency. There are no cold starts since Workers are always ready, and parallel processing allows multiple requests to be handled simultaneously without blocking each other.
The caching challenge
One of the biggest performance bottlenecks in any web application is database access. Every pixel request needed to validate the beacon token, check if the requesting domain is authorized, and verify quota limits. If each of these required a database query, we'd be looking at 50-100ms response times instead of sub-10ms. I solved this with a multi-layered caching strategy.
The challenge was balancing cache freshness with performance. Too short TTLs would defeat the purpose, while too long TTLs could lead to stale data. I settled on different TTLs based on how frequently each type of data changes, authentication data changes rarely, so it gets a longer cache, while quota data changes frequently, so it uses a more aggressive caching strategy.
The security paradox
When you build a security tool, you paint a target on your own back. If someone compromises your detection system, they can silence alerts or steal sensitive data. So, I had to treat my own app as a high-value target from day one.
Everything is locked down: server-side sessions only (no client tokens), HTTP-only cookies, bcrypt for passwords, aggressive session cleanup, and strict rate limiting. All sensitive data is encrypted at rest, security headers are set everywhere, and input validation is non-negotiable. No dynamic SQL, ever—only parameterized queries. Minimal data collection, automatic retention cleanup, GDPR export/deletion, and zero third-party tracking. Basically, I tried to make it harder to break into this than most of the apps it protects.
Making it work for real businesses
The technical architecture was only half the battle. The real challenge was making this system practical for real businesses to use. I needed to solve problems that go beyond just detecting threats, problems like user onboarding, team management, cost control, and integration with existing workflows.
The onboarding challenge
Most security tools require weeks of setup, training, and configuration. I wanted something that could be deployed in minutes, not weeks or months. The key was making the initial setup as simple as possible while still providing the power that security teams need.
The onboarding process starts with a simple signup form. Users create an account, verify their email, and immediately get access to a dashboard. The first step is adding your domain, then you create your first beacon, which generates a unique tracking pixel that you embed on your site.
The beauty of this approach is that it works immediately. As soon as you add the pixel to your site, the system starts monitoring. There's no complex configuration, no training required, no fancy libraries, no integration headaches. You can literally go from zero to monitoring in under 5 minutes.
Team management for growing companies
Small companies start with one person managing security, but as they grow, they need to bring in more team members. The system needed to support this natural evolution without requiring a complete overhaul.
I built a flexible team management system that starts simple but scales with your needs. Initially, you might be the only user with full admin access. As your company grows, you can invite team members with different permission levels, admins who can manage everything, users who can create and manage beacons, and viewers who can only see reports and alerts.
The invitation system is designed to be frictionless. You simply enter an email address and select a role. The invited user gets an email with a secure link to join. No complex setup, no IT department involvement, no lengthy approval processes. The whole thing is built for SMBs first—simple, fast, and practical for real teams, not weighed down by enterprise red tape or giant org charts.
Cost control and predictable pricing
I wanted to eliminate uncertainty. The pricing model is designed around three simple tiers. The free plan covers a small number of hits, perfect for small websites or testing. The Plus plan covers a much higher amount, suitable for most growing businesses. The Enterprise plan is unlimited, ideal for large organizations that want to have an extra layer of protection on top of their more robust and complex solutions.
The key insight was that most companies don't need unlimited everything. By setting reasonable limits and making them transparent, companies can predict their costs and scale as needed. The quota system ensures that you never get surprise bills. If you hit your limit, the system continues to work (always returning a valid pixel) but stops processing new requests, and incidents until the next month.
Integration with existing workflows
Security teams don't work in isolation. They need to integrate with existing tools and workflows, like Slack for notifications, Jira for incident tracking, email for alerts, webhooks for custom integrations. The system needed to fit into these existing processes, not replace them.
I built comprehensive integration capabilities from day one. Webhook notifications can be sent to any endpoint, with payloads that include all the threat information. And I plan to enable email alerts that can be configured with different templates for different threat levels.
The dashboard challenge
Security dashboards are notoriously complex and overwhelming. I wanted to create something that was both powerful and approachable, something that a non-technical business owner could understand while still providing the depth that security professionals need.
The dashboard is organized around the key questions that security teams ask: "What threats are active right now?", "How much are we being targeted?", "What's our current usage?", "Who on our team needs to know about this?"
The main overview shows active threats with threat levels (low, medium, high, critical) and recent activity. The threats section provides detailed information about each attacking domain, including incident history, geographic distribution (based on where potential victims are visiting the cloned phishing sites from), and recommended actions. The key was making the information actionable. Instead of just showing raw data, the dashboard provides context and recommendations.
Real-world testing and validation
Before launching, I need to validate that the system would work in real-world conditions. I plan to test it with a couple of companies of different sizes, from small startups to established businesses in the finantial services industry. The feedback will be invaluable.
I'll incorporate this feedback into the system. Real-world usage always reveals what actually matters, and it's also perfect for trimming out anything that's unused or irrelevant. The idea is to keep things practical and focused.
Once the system has been thoroughly tested and proven effective in real-world scenarios, I'll launch it publicly. For now, it's still in closed beta. If you're interested in early access or want to try it out for your company, just reach out to me directly.